Debugging using breakpoints
When developing Rule sets breakpoints (F9) can be set to stop the processing at a specific process(advice: insert the breakpoint in an empty process that does not execute anything).
When execution has been stopped at a breakpoint Continue (F10) to proceed.
This is particularly useful for executing a loop step by step:
- Loop over image object domain using current image object.
- Loop over an array domain, e.g. array containing classes.
- Loop using Loops & Cycles Number of cycles.
The Find and Replace Bar 
Find and Replace is a useful method to browse and edit rule set items, allowing you to replace them by rule set items of the same category. This is helpful especially for maintaining large rule sets and for development in teams.
Within a rule set, you can find and replace all occurrences the following rule set items: algorithms (within an rule set loaded in the Process Tree window); arrays; classes; class variables; features; feature list variables; feature variables; image layers; image layer variables; image object levels; image object list variables; level variables; map name variables; object variables; region variable; scene/map variables; text; thematic layers and thematic layer variables.
To open the Find and Replace window, do one of the following:
- Press Ctrl + F on the keyboard
- Choose Process > Find and Replace or View > Window > Find and Replace from the main menu
- Right-click a class within the Class Hierarchy window and choose Find Class from the context menu
- Right-click a feature in the Object Information or Feature View windows and choose Find from the context menu
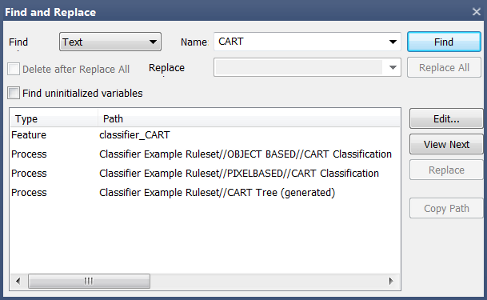
The Find drop-down list lets you select the category of rule set items you want to find.
To search on text occurring in any category, select the Text field. The Name field lets you specify a rule set item within the category.
When you press Find, the corresponding processes are highlighted in the Process Tree window. Use View Next to browse the found items. To edit a rule set item, double-click it or select the item and click the Edit button. The appropriate editing dialog will open (for example, the Edit Process dialog box for a found process). Replace and Replace All functions are available.
To copy the path of a process, select the appropriate result and press Copy Path.
Find and Replace Modifiers
There are two checkboxes in the Find and Replace window – Delete After Replace All and Find Uninitialized Variables.
Selecting Delete After Replace All deletes any unused features and variables that result from the find and replace process. For instance, imagine a project has two classes, ‘dark’ and ‘bright’. With ‘class’ selected in the Find What drop-down box, a user replaces all instances of ‘dark’ with ‘bright’. If the box is unchecked, the ‘dark’ class remains in the Class Hierarchy window; if it is selected, the class is deleted.
Find Uninitialized Variables simply lets you search variables that do not have an explicit initialization.
Rule Set Documentation
Adding Comments
It is good practice to include comments in your rule sets if your work will be shared with other developers.
To add a comment, select the rule set item (for example a process, class or expression) in a window where it is displayed – Process Tree, Class Hierarchy or Class Description.
The Comment icon appears in a window when you hover over an item; it also appears in the relevant editing dialog box. The editing field is not available unless you have selected a rule set item. Comments are automatically added to rule set items as soon as another rule set item or window is selected.
The up and down arrows allow you to navigate the comments attached to items in a hierarchy. Paste and Undo functions are also available for this function.
There is an option to turn off comments in the Process Tree in the Options dialog box (Tools > Options).
The Rule Set Documentation Window 
The Rule Set Documentation window manages the documentation of rule sets. To open it, select Process > Rule Set Documentation or View > Windows > Rule Set Documentation from the main menu.
Clicking the Generate button displays a list of rule set items in the window, including classes, customized features, and processes. The window also displays comments attached to classes, class expressions, customized features and processes. Comments are preceded by a double backslash. You can add comments to rule set items in the window then click the Generate button again to view them.
It is possible to edit the text in the Rule Set Documentation window; however, changes made in the window will not be added to the rule set and are deleted when the Generate button is pressed. However, they are preserved if you Save to File or Copy to Clipboard. (Save to File saves the documentation to ASCII text or rich text format.)
Process Paths
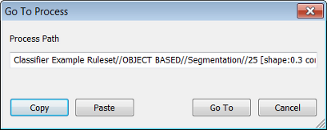
A Process Path is simply a pathway to a process in the Process Tree window. It can be used to locate a process in a rule set and is useful for collaborative work.
Right-click on a process of interest and select Go To (or use the keyboard shortcut Ctrl-G). The pathway to the process is displayed; you can use the Copy button to copy the path, or the Paste button to add another pathway from the clipboard.
Improving Performance with the Process Profiler 
The time taken to execute a process is displayed before the process name in the Process Tree window. This allows you to identify the processes that slow down the execution of your rule set. You can use the Process Profiler to identify processes so you can replace them with less time-consuming ones, eliminating performance bottlenecks. To open the Process Profiler, go to View > Windows > Process Profiler or Process > Process Profiler in the main menu. Execute a process and view the profiling results under the Report tab.
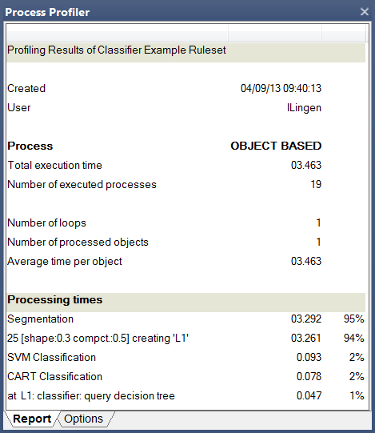
- Times below one minute are displayed as seconds and milliseconds
- Times below one hour are displayed as minutes, seconds and milliseconds
- Longer times are displayed as hours, minutes and seconds.
By default, the slowest five processes are displayed. Under the Options tab, you can change the profiling settings.
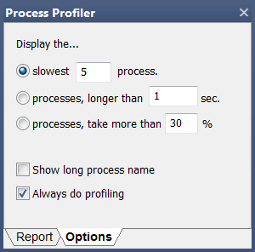
You can also inactivate process profiling in Tools > Options, which removes the time display before the process name.
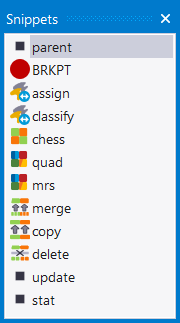
Snippets 
A process snippet is part of a rule set, consisting of one or more processes. You can organize and save process snippets for reuse in other rule sets. You can drag-and-drop processes between the Process Tree window and the Snippets window. To reuse snippets in other rule sets, export them and save them to a snippets library. Open the Snippets window using View > Windows > Snippets or Process > Snippets from the main menu.
By default, the Snippets window displays frequently used algorithms that you can drag into the Process Tree window. Drag a process from the Process Tree window into the Snippets window – you can drag any portion of the Process Tree along with its child processes. Alternatively, you can right-click process or snippets for copying and pasting. You can also copy snippets from the Snippets window to any position of the Process Tree window.
To save all listed snippets in a snippets library, right click in the Snippets window and select Export Snippets. All process snippets are saved as a snippet .slb file. To import Snippets from a snippets library, right-click in the Snippets window and select Import Snippets.
You cannot add customized algorithms to the Snippets window, but snippets can include references to customized algorithms.
Snippets Options
- You can rename the processes in the Snippets window by clicking twice on the name and entering a new one. However, when you paste it back into the Process Tree window it will revert to its original name
- The contents of the Snippets window will remain there until deleted. To delete, right click on a process snippet and select Delete or Delete All from the context menu.
